Introduction
About IcoFX
IcoFX is a professional icon and cursor editor designed to work with small images. You can easily create, edit, read and save icons with transparency for Windows XP, Vista and Macintosh. You can convert your favorite images into icons, or icons to images. With the help of many tools and more than 40 effects icon creation is made easy. It offers powerful tools like Brighten, Darken, Blur and Sharpen for retouching your icons in minutes. In the integrated workspace you can easily preview, save, change your icons.
IcoFX can handle also Macintosh OS X icons. You can convert your Macintosh icons to Windows icons and vice versa. You can extract icons from Windows or Macintosh resource files. Beside icon creation IcoFX is able to create static and animated Windows cursors. With the integrated resource editor you can create icon libraries (ICL files) or change the icon and cursors of applications.
↑ Top of PageContentSystem Requirements
- Microsoft Windows 10, 8, 7, Vista or XP operating system.
- Intel Pentium / AMD Athlon processor or equivalent running at 2 Ghz or more
- 512 MB RAM (1 GB RAM recommended)
- 50 MB free hard drive space (100 MB recommended)
↑ Top of PageContent
Installation
To start the installation of IcoFX download the installer from https://icofx.ro. The installer is an exe file: icofxsoftware.exe. Start the installer by double clicking the file.
On Windows Vista and above you must allow the file to run. The User Account Control will ask you if you want to install the program. Press the Yes button to start the installation of IcoFX.

UAC Dialog on Windows 10
In the first step of the installation you can choose the language of the installer and IcoFX. The language that you choose will be applied also to IcoFX. However you can change that also later using the "Options/Languages" menu item.

Select the language of the installer
Next the Installer will start using the language you selected in the previous step. The installer displays the license agreement. You accept the agreement by selecting the "I accept the agreement radio button. Pressing the Install button will install IcoFX on your computer. If you check the "Custom installation" check box then you'll have some extra options on the next screen.
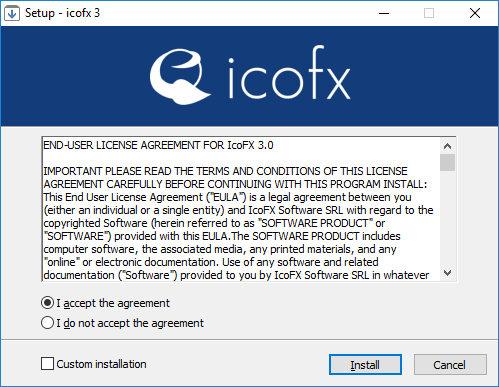
The installer of IcoFX
If you checked the "Custom installation" check box on the previous screen then you'll have some extra options. If you did not check the check box then this step will be skipped.

The installer options of IcoFX
On this screen you have the following option:
- Set the installation folder of IcoFX
- Option to create a desktop shortcut for IcoFX
- Option to associate icon, cursor, icon library and cursor library files to IcoFX.
Pressing the Install button will install IcoFX on your computer.
On the next screen press the Finish button to finish the installation. If the "Launch IcoFX" check box is left checked then IcoFX will automatically start when the installation window closes.

Installation finished
Registering Your Copy
You can download and try IcoFX free of charge. You can run the evaluation version up to 30 days. After this the save feature will be disabled. Register your copy to remove the following limitations:
- The save feature will always be enabled
- Add more than 5 icons to an icon library
- Batch process more than 5 files (using Business or Site license)
- Support for toolbar image strips (using Business or Site license)
To purchase IcoFX please use the "Help/Purchase Full Version" menu item. This will open the online store of IcoFX in your browser. After you have successfully purchased IcoFX you will receive an email containing your registration key.
After purchasing IcoFX you are ready to register your copy. Use the "Help/Register..." menu item to open the IcoFX Registration dialog.

IcoFX Registration Dialog
On this dialog you should enter your name (this name will be displayed in the About box) and the registration key that you received via email. If you entered the key correctly then the Register button will be active. Press the Register button to finalize the registration process.
Note: You can copy/paste the registration key, no need to enter it manually.
↑ Top of PageContent