Layers
Using IcoFX you can create layer-based images. Each layer is a different image. The layers are stacked upon another. The transparent areas on an upper layer let you see the layer below. The final appearance of the image depends on the order and properties of the layers.
Though using layers is not necessary, it is always recommended. This lets you modify the image more easily. If you are not happy with an aspect of your image you can only change the layer that contains that aspect, the rest of the image remains unchanged. This is not possible if you are not using layers.
To create a layer based image in IcoFX use the "File/New/New Image..." menu item to create the image.
You can work easily with layers using the Layers panel of IcoFX.

The Layers Panel
On this panel you can manage the layers of the image. The list of the available layers is displayed showing the layer name, visibility and preview. If you click on a layer you can see its blend mode and opacity in the top of the panel.
The layers are arranged like they are displayed in the Layers panel. The top layer is the upper layer in the list. You can rearrange the layers by dragging the layer to the desired location. You can drag the layers also on the side bar of the canvas window.
A layer has three properties that you can set: visibility, blend mode and opacity. You can toggle the visibility of the layer by clicking on the eye icon after its name. You can set the blend mode and opacity of the layer on the top of the Layer panel. You can use the Layers Properties dialog to set the name of the layer and all the above mentioned properties.
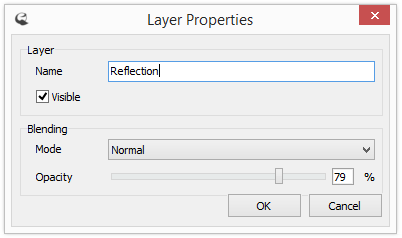
The Layers Properties Dialog
Using the tool bar of the Layers panel you can do the following actions:
- Create a new layer - If you press the "Add New Layer" button then a new empty layer will be inserted above the selected layer.
- Import a layer - Pressing the "Import From File" button allows you to create a new layer from an already existing file. An open dialog will appear where you can select the desired image file.
- Duplicate Layer - The "Duplicate Layer" will duplicate the selected layer.
- Edit layer properties - Using the "Layer Properties" button you can open the Layer Properties dialog to set the properties of the layer.
- Delete Layer - This button will delete the selected layer. The last layer cannot be deleted from the image.
- Move Layer Down - Moves the selected layer one layer down. You can move the layers also by drag and drop.
- Move Layer Up - Moves the selected layer one layer up. You can move the layers also by drag and drop.
- Merge Down - This button gives you the opportunity to unify two layers. The upper layer will be merged onto the lower layer resulting a layer that is the composite of the two layers. Using this technique you can reduce the complexity of your layers.
- Flatten Image - Using the "Flatten Image" button you can merge all your layers into one single layer. Pressing the button will leave you with one single layer that is the composite of all the previously available layers.
↑ Top of PageContent
Opacity
The opacity of a layer controls how transparent a layer is. A layer with 100% opacity is not transparent, the underlaying layer is not visible except if the layer contains transparent areas. A layer with a smaller opacity value is transparent. The underlaying layer will shine through regardless if the layer has or not transparent areas.
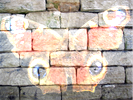
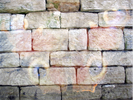
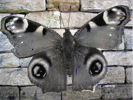
Here you can see a layer (butterfly) with different opacity values. Notice how the bottom layer (stone wall) shines through.

A layer with 100%, 75%, 50% and 25% opacity
Blending Modes
The blending mode specifies the way in which the pixels of a layer interact with the pixels of an underlaying layer. Blending modes with painting tools or layers can be used to achieve special effects or to retouch images.
By default the Normal blending mode is used, that causes the brush strokes to paint traditionally over the image. Other blend modes offer a wide variety of interactions.
In IcoFX you can choose between 24 blending modes:

Normal

Multiply
Additive

Color Burn

Color Dodge

Reflect

Glow

Overlay

Difference

Negation

Lighten

Darken
Screen

Exclusion

Hue

Saturation

Color
Brightness

Soft Light

Hard Light

Pin Light

Freeze

Heat

Subtractive
↑ Top of PageContent