Working with gradients
IcoFX gives you the possibility to create custom gradients. In this tutorial we will create a custom gradient, so that we see how to use gradients.
Creating a new gradient
1. Create a new gradient by pressing the "New Gradient..." toolbar button in the Gradients panel. This will open the Gradient Editor dialog.
The Gradient Editor Dialog
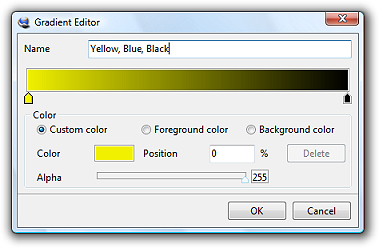
We name the gradient "Yellow, Blue, Black" by entering the name in the Name edit box. This name will be displayed in the Gradients panel.
2. We will create a gradient with three colors: yellow, blue and black. By default we have a white and black color in the gradient. Click on the white color thumbnail under the gradient preview. Click on the color box to change its color to yellow. We now have two colors: yellow and black.
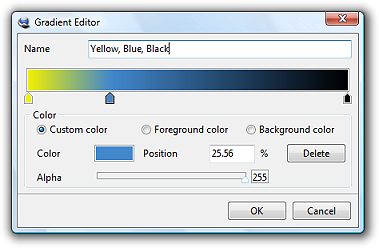
3. We will add the third color, the blue, in the middle of the yellow and the black. Click on the thumbnail area under the gradient preview where the color thumbnails are. By clicking on an empty area a new color thumbnail will be created. You can drag the color thumbnail to the desired position. Click on the color box to change its color to blue. Now our gradient looks something like this:
The Gradient Editor Dialog
4. We are finished with editing the gradient. Press the OK button to close the Gradient Editor dialog. The new gradient is visible in the Gradients panel.
↑ Top of PageContentFill an area of the canvas
5. In the Gradients panel select the gradient that we created in the previous steps.
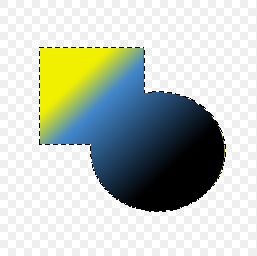
6. Using the selection tools select an area of the screen that you would like to fill with the gradient. You can combine selections if you select the "Add to selection" mode on the Tool Properties panel. Also check the "Anti-alias" check box to have smooth edges. For example this is a selected area created by a rectangle and an ellipse selection:

The Selected Area
7. Select the gradient tool on the Tools panel, and draw a gradient on the canvas. The gradient will be applied only to the selected area.
The Selected Area Filled With Gradient
Create a gradient filled shape
Another method to fill an area of the screen with a gradient is to draw gradient filled shapes. You can draw rectangles, ellipses, rounded rectangles and custom shapes filled with gradients using the available tools in the Tools panel. We will create an ellipse filled with a gradient to simulate a shiny button.
1. Create a new image using the "File/New Image..." menu item.
2. Select the Black and White gradient from the Gradients panel.
3. Select the Ellipse tool on the Tools panel.
4. Set the properties of the tool on the Tool Properties panel:

The Properties of The Ellipse Tool
We set the following properties of the Ellipse:
- Set the outline to "Outline and fill" so the ellipse will have an outline, and it will be also filled.
- We set the fill type of the ellipse to radial gradient.
- We set the center of the gradient (x and y coordinate) to 25% to have the center of the gradient in the top-left corner.
- Set the Focus Scale to 10%, so that the center of the gradient will be larger.
5. Draw an ellipse on the canvas. The finished ellipse should look something like this:
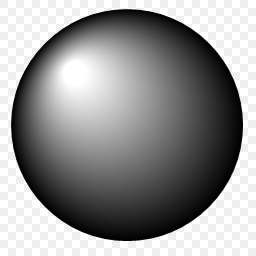
The Gradient Filled Ellipse